How to Set up a Chainlink Node
Table of contents (9)
- 1Components Needed to Set up a Chainlink Node
- 1.1Chainlink Node Client Software
- 1.2PostgreSQL Database
- 1.3Blockchain RPC Node
- 1.4External Adapters
- 1.5Monitoring/Alerting System
- 2First Considerations When Wondering How to Set up a Chainlink Node
- 2.1Self-Deployed Architecture vs AWS Quickstart
- 2.2Debugging and Maintenance
This article is geared as an introduction toward those wondering how to set up a Chainlink node and dealing with the component stack requirements for the first time.
Components Needed to Set up a Chainlink Node
For a better understanding of the individual components of a Chainlink node and their functions, let us take a closer look at each one.
Chainlink Node Client Software
At its heart is the open-source software that a node operator runs on a server, designed to connect on-chain and off-chain environments through decentralized peer-to-peer communications. It has a dedicated internal wallet that allows the node to pay gas in the chain’s native asset to send transactions. The minimum hardware requirements of a standard Chainlink node server are low at 2 cores and 4GB of RAM.
PostgreSQL Database
Each Chainlink node needs a dedicated object relational database to keep state and store a history of its operations. This includes blockchain synchronization, transaction history, all historical job runs and much more. Its minimum hardware requirements are 2 cores, 4GB RAM and a 100GB SSD disk.
Blockchain RPC Node
In order to sync blocks and perform read/write operations, each Chainlink node requires a full connection to the network to be supported. Communication is implemented using the HTTP and WebSocket protocols. RPC nodes have different hardware requirements across different networks.
For an Ethereum mainnet full node (go-ethereum and consensus client) 4 cores, 16GB RAM and a 2TB SSD disk are officially recommended. The respective networks and client developers provide detailed insights into the hardware requirements of RPC nodes and how to set them up in their documentation pages.
External Adapters
This is lightweight, customizable middleware that a Chainlink node connects to via HTTP or WebSocket to retrieve data from web APIs, other off-chain resources, smart contracts, or other external adapters.
Monitoring/Alerting System
A monitoring and alerting system is peripheral off-chain infrastructure that monitors the performance and reliability of a Chainlink node environment in real time. From basic host metrics to specific service metrics and logs, everything should be graphically visualized in a central workspace. Alerting for various situations must be set up so that problems that could lead to node downtime can be fixed before they occur.
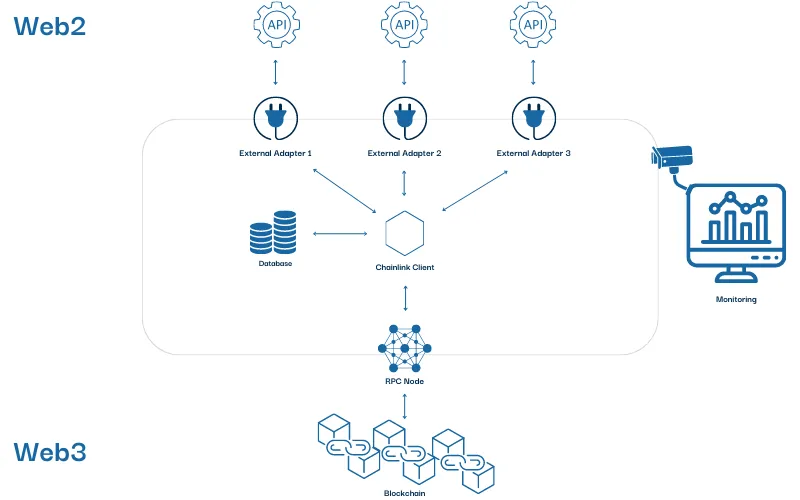
A Chainlink node consists of various on-chain and off-chain components
First Considerations When Wondering How to Set up a Chainlink Node
We recommend anyone who is new to this and looking to set up a Chainlink node to first read the Running a Chainlink node and Performing System Maintenance sections of the official Chainlink documentation. These include step-by-step guides for setting up a first Chainlink node which should be followed to gain initial practical experience.
It is recommended to run Chainlink nodes with Docker as container orchestration software, leading to one of the first questions of how and where to host the necessary services of the stack. When first coming to understand the environment, it is sufficient to host the Chainlink node and the PostgreSQL database locally. It is also recommended to start with a testnet node which is why it is perfectly sufficient to use a third-party RPC provider for the blockchain connection of the Chainlink node.
Well-known and proven providers are, for example:
For those who wish to advance from hosting their Chainlink node stack locally, the question of hosting service providers arises. We will dedicate a future blog post to an in-depth comparison between cloud-based and data center hosting environments. First, let us address the topic of self-deployed vs out-of-the-box Chainlink node stacks.
Self-Deployed Architecture vs AWS Quickstart
There are many different ways to set up a Chainlink node, then configure it and run it successfully. Regardless of the route taken, it is important to note that security and high availability play a crucial role. Large cloud computing platforms offer many services which can help node operators to establish security and high availability best practices without manually setting up, configuring and maintaining all the services responsible for this themselves. Although these platforms differ in the details and costs of the services they offer, they usually cover all the features required for a Chainlink node stack so it is worth testing different providers to determine personal preference. Another slightly more involved option is to use a data centre as a server colocation provider to host your node on a bare metal server, for example.
It must also be mentioned here that AWS offers a Chainlink Quickstart solution. This automated reference deployment uses AWS CloudFormation templates to deploy the required services following AWS best practices in about 45 minutes. Of course, this is also possible without Quickstart, both on AWS and on other comparable platforms. While the Quickstart solution may be faster and easier to initialize, it can have the disadvantage that you have not deployed all the components yourself and may therefore not fully understand all services in detail.
Debugging and Maintenance
If you encounter problems with your first practical tests deploying a Chainlink node, you can draw on the shared experiences of other node operators. Stack Overflow, Ethereum Stack Exchange and the official Chainlink Discord are valuable platforms which act both as archives and actively used resources.